30 August 2020

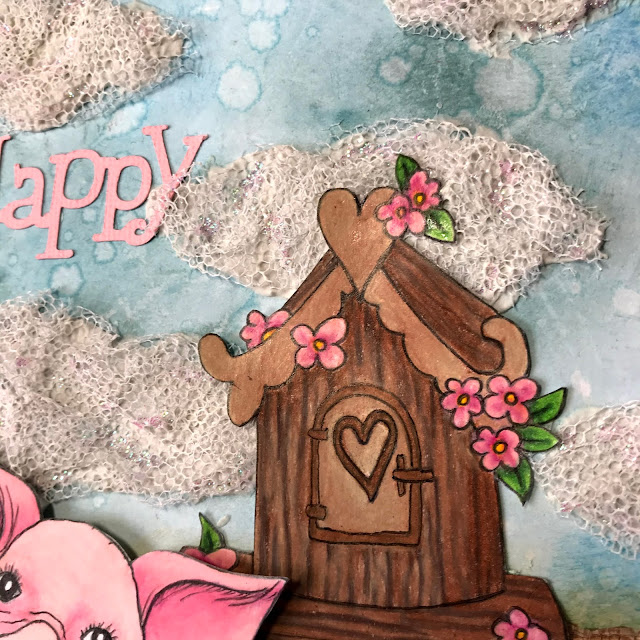
Happy Piggy, Polkadoodles Mixed Media Tag #2

 Full Video Tutorial:

Welcome!

Thank you for joining me today, this post is a mixed media tag created with Polkadoodles products so the ones I have used for this creation will be linked at the bottom of the post.
I hope you enjoy.


To start this tag I used distress ink in several different colours (the names can be found in the video tutorial). I then used crackle paste on the bottom half and painted the paste in brown to make it look like mud. I used modelling paste for the clouds and used tulle over the top with a subtle pink glitter glue to add a little sparkle. 


I used colouring pencils for the two focal images you can see here and went over the lines with a black fine liner to bring them out. The piggy was stuck with foam tape so it jumps off the page.
I finished the project adding the word "happy" as a title and adding ribbon and lace for the tag.


Here is the final result, I hope you enjoyed this mixed media tag. Please see below the links to each of the Polkadoodles products used on this page. 
I will see you next time, where we will turn your creative spark, into a Creative Sparkle.

Thank you.

28 August 2020

Art Journal Page Process, Prompt List #23

 Full Video Tutorial:

Welcome!


Above is the prompt list tutorial video. The full prompt list can be found at the end of the video.
I encourage you to follow the prompts using your stash and see how the page turns out.

I have written the prompts for you to enjoy crafting without any expectations. Each of the lists that I write and follow, I have no plan in mind and I follow each step which makes crafting fun and care free. You can also use the same list multiple times and the outcome can be completely different.

Each of the prompt lists can be used for art journal pages, or if you prefer, you can create a canvas or tag with the steps. Whatever you feel like creating!

I hope you enjoy this weeks page.
If you create something that may have been inspired by the page/list, I would love to see your creation. Feel free to tag me on instagram with #SparklePrompts for any prompt list creations.


To begin this page, I applied a base colour of avocado green and used oil pastel to add the patches of blue and scratched patterns in.  


My focal image is a monster I created and I added purple rain and borders after sticking him onto the page.


I then added four friends for my monster and added shadows. The final step was adding the title, giving the creatures names.


Here is the full page spread, I hope you enjoyed this weeks prompt list.
If you have any questions, please do not hesitate to comment down below.

I will see you next time, where we will turn your creative spark, into a Creative Sparkle.
Thank you

21 August 2020

Art Journal Page Process, Prompt List #22

 Full Video Tutorial:

Welcome!


Above is the prompt list tutorial video. The full prompt list can be found at the end of the video.
I encourage you to follow the prompts using your stash and see how the page turns out.

I have written the prompts for you to enjoy crafting without any expectations. Each of the lists that I write and follow, I have no plan in mind and I follow each step which makes crafting fun and care free. You can also use the same list multiple times and the outcome can be completely different.

Each of the prompt lists can be used for art journal pages, or if you prefer, you can create a canvas or tag with the steps. Whatever you feel like creating!

I hope you enjoy this weeks page.
If you create something that may have been inspired by the page/list, I would love to see your creation. Feel free to tag me on instagram with #SparklePrompts for any prompt list creations.


To begin this page I primed with white gesso, used a baby blue acrylic paint for the background base. I used masking tape to create stripes and then applied a coat of flesh colour over the top before peeling away the masking tape to reveal the stripes.


The next step was to print circles onto the background in the same baby blue as before. I then used my sewing machine to add stitches in a zigzag form onto the page. I used clear texture paste mixed with red and black paint through a circles stencil to add texture to the page.


I used a mannequin stamp and painted it with the same black and red acrylic paints, then added 5 pieces of ephemera to match the layout so far. 


I used a dark red embroidery thread to lead each one of the pieces of ephemera to the focal image.


I added a sentiment with the stitches implied onto the page, and to finish I used a red marker pen to add dots to bring the page together.


Here is the full page spread, I hope you enjoyed this weeks prompt list.
If you have any questions, please do not hesitate to comment down below.

I will see you next time, where we will turn your creative spark, into a Creative Sparkle.
Thank you

14 August 2020

Art Journal Page Process, Prompt List #21

  Full Video Tutorial:


Welcome!

Above is the prompt list tutorial video. The full prompt list can be found at the end of the video.
I encourage you to follow the prompts using your stash and see how the page turns out.

I have written the prompts for you to enjoy crafting without any expectations. Each of the lists that I write and follow, I have no plan in mind and I follow each step which makes crafting fun and care free. You can also use the same list multiple times and the outcome can be completely different.

Each of the prompt lists can be used for art journal pages, or if you prefer, you can create a canvas or tag with the steps. Whatever you feel like creating!

I hope you enjoy this weeks page.
If you create something that may have been inspired by the page/list, I would love to see your creation. Feel free to tag me on instagram with #SparklePrompts for any prompt list creations.

To begin this page I stuck down torn book pages. I then used a patterned tissue paper over the top with a layer of watered down white gesso to prime. I then added triangles of fabric across the background.
I added paper doilies coloured with Distress Ink Sprays in three shades of brown to the background. A layer of watered down Vintage Photo Spray was then used to colour the background.
The focal image you can see here was something I found in a magazine and it fit the theme rather well.
After adding that, I used a die to cut mini envelopes and added them across the page too.
For the title I used a project life card cut down into a square and added a quote from Katharine Hepburn. I then used a wax seal on the corner. The wax seal was also used for the mini envelopes to complete the page.


Here is the full page spread, I hope you enjoyed this weeks prompt list.
If you have any questions, please do not hesitate to comment down below.

I will see you next time, where we will turn your creative spark, into a Creative Sparkle.
Thank you

07 August 2020

Art Journal Page Process, Prompt List #20

 Full Video Tutorial:


Welcome!

Above is the prompt list tutorial video. The full prompt list can be found at the end of the video.
I encourage you to follow the prompts using your stash and see how the page turns out.

I have written the prompts for you to enjoy crafting without any expectations. Each of the lists that I write and follow, I have no plan in mind and I follow each step which makes crafting fun and care free. You can also use the same list multiple times and the outcome can be completely different.

Each of the prompt lists can be used for art journal pages, or if you prefer, you can create a canvas or tag with the steps. Whatever you feel like creating!

I hope you enjoy this weeks page.
If you create something that may have been inspired by the page/list, I would love to see your creation. Feel free to tag me on instagram with #SparklePrompts for any prompt list creations.

To begin this page I used magazine titles to cover the background. Covering that with a sheet of tissue paper and adding a layer of watered down gesso to prime. 
I then added two different pinks with pallet knives and a white acrylic to add interest with a stencil.
I then used two napkins, one to add the flower and one to add the flying creature that you can see. I added them to white cardstock and fussy cut them before adding them to the page.
I added highights and shadows with sharpies, outlining the images with blue and adding detail to the flower in pink. I then added splashes in the colour sap green.
The finishing touch was to add a title from a magazine, I used Mowed Lawn distress ink to edge it before adding.

Here is the full page spread, I hope you enjoyed this weeks prompt list.
If you have any questions, please do not hesitate to comment down below.

I will see you next time, where we will turn your creative spark, into a Creative Sparkle.
Thank you

Art Journal Page Process, Prompt List #52

 Full Video Tutorial: Welcome! Above is the prompt list tutorial video. The full prompt list can be found at the end of the video. I encoura...