27 February 2021

Art Journal Page Process, Prompt List #49

 Full Video Tutorial:

Welcome!


Above is the prompt list tutorial video. The full prompt list can be found at the end of the video.
I encourage you to follow the prompts using your stash and see how the page turns out.

I have written the prompts for you to enjoy crafting without any expectations. Each of the lists that I write and follow, I have no plan in mind and I follow each step which makes crafting fun and care free. You can also use the same list multiple times and the outcome can be completely different.

Each of the prompt lists can be used for art journal pages, or if you prefer, you can create a canvas or tag with the steps. Whatever you feel like creating!

I hope you enjoy this weeks page.
If you create something that may have been inspired by the page/list, I would love to see your creation. Feel free to tag me on instagram with #SparklePrompts for any prompt list creations.


To begin this page I primed with white gesso and then added modelling paste with two different stencils, one crackle effect and one circles.
To continue the background I then used tissue paper from a dress pattern and stuck it down, making sure to rub over the texture created from the modelling paste applied previously.


I primed the page once again with clear gesso this time, and applied brown acrylic ink to the full spread.
Once dry, I used distress oxide ink in Black Soot with a blending tool just to bring out the texture from my previous stencilling.
I then used several stamps from a Docrafts stamp set called Musicality, and used Jet Black archival ink to apply them to the background.


I found a costume glove with lace pattern in my stash and cut out the flowers, I then used ink to colour them in distress ink spray with Rusty Hinge and added them to the page using mod podge.
For the focal image I cut a silhouette of a dress stand and applied washi tape to it for the pattern.


I added splashes to the layout, using white acrylic paint mixed with Rusty Hinge distress ink spray for the first colour. I then added a second set of splashes by adding Fired Brick distress ink spray to the mixture and used my fan brush to splash.


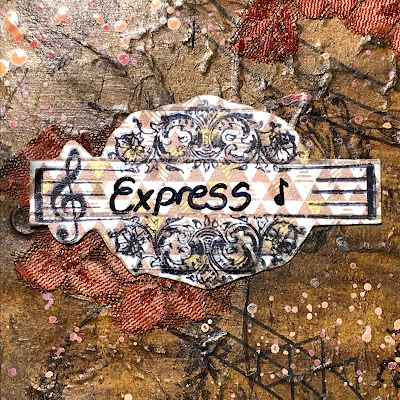
For the final step I added the title using a stamp from the stamp set used for the background stamping, and used a piece of white card to stamp onto, I then applied washi tape and used Jet Black in archival ink to stamp over the top.
I used a black sharpie to add the word Express for my title and gave the focal image an outline to finish.

Here is the full page spread, I hope you enjoyed this weeks prompt list.

If you have any questions, please do not hesitate to comment down below or on the comments in the YouTube video and I will get back to you.

I will see you next time, where we will turn your creative spark, into a Creative Sparkle.

19 February 2021

Art Journal Page Process, Prompt List #48

 
Full Video Tutorial:

Welcome!


Above is the prompt list tutorial video. The full prompt list can be found at the end of the video.
I encourage you to follow the prompts using your stash and see how the page turns out.

I have written the prompts for you to enjoy crafting without any expectations. Each of the lists that I write and follow, I have no plan in mind and I follow each step which makes crafting fun and care free. You can also use the same list multiple times and the outcome can be completely different.

Each of the prompt lists can be used for art journal pages, or if you prefer, you can create a canvas or tag with the steps. Whatever you feel like creating!

I hope you enjoy this weeks page.
If you create something that may have been inspired by the page/list, I would love to see your creation. Feel free to tag me on instagram with #SparklePrompts for any prompt list creations.


To begin this page I used tissue with mod podge to add texture to the outside edge. I then primed the page and added the colour Latte in acrylic for a base.
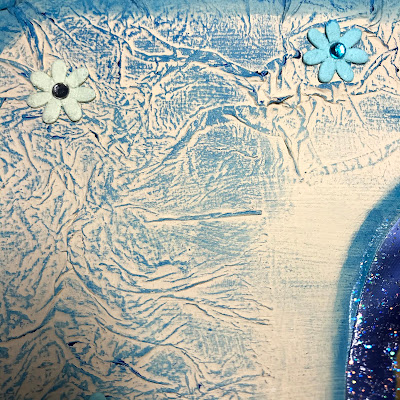
Once dry I used a blue gelato to bring out the texture of the tissue added.
I added small paper flowers from my stash to add interest.


For the focal image I chose it from a magazine and fussy cut it, adding it to the page with PVA glue.
I then used the same gelato to darken around the edge of the focal image.
To add some interest to the focal image I used glitter mod podge to add sparkle to the globe part.


I used a piece of card with the same gelato to colour it, and added a title to the page with this and a metallic black pen.
To complete the page I used the same gelato add a border.


Here is the full page spread, I hope you enjoyed this weeks prompt list.

If you have any questions, please do not hesitate to comment down below or on the comments in the YouTube video and I will get back to you.

I will see you next time, where we will turn your creative spark, into a Creative Sparkle.

12 February 2021

Art Journal Page Process, Prompt List #47

 Full Video Tutorial:

Welcome!


Above is the prompt list tutorial video. The full prompt list can be found at the end of the video.
I encourage you to follow the prompts using your stash and see how the page turns out.

I have written the prompts for you to enjoy crafting without any expectations. Each of the lists that I write and follow, I have no plan in mind and I follow each step which makes crafting fun and care free. You can also use the same list multiple times and the outcome can be completely different.

Each of the prompt lists can be used for art journal pages, or if you prefer, you can create a canvas or tag with the steps. Whatever you feel like creating!

I hope you enjoy this weeks page.
If you create something that may have been inspired by the page/list, I would love to see your creation. Feel free to tag me on instagram with #SparklePrompts for any prompt list creations.


This page was stared with a tissue paper covering the background with decoupage method using mod podge. I then primed the page with clear gesso. To add interest I applied crackle texture paste with a pallet knife.


Once the texture paste had dried it had warped the page but I decided to continue with it instead of starting over. For the focal image I chose an image I had in my stash and cut it up, adding it to the page with gel medium as a mosaic.
The ephemera I added were related to the focal image, I added these as mosaic to make the page more cohesive.


To the texture paste I added some colour with a watered down gelato to bring out the cracks as you can see here.


I added a one word title as you can see here, with puffy stickers from my stash.
To finish the page I added some doodling of cells with a black sharpie across the background.


 Here is the full page spread, I hope you enjoyed this weeks prompt list.

If you have any questions, please do not hesitate to comment down below or on the comments in the YouTube video and I will get back to you.

I will see you next time, where we will turn your creative spark, into a Creative Sparkle.

05 February 2021

Art Journal Page Process, Prompt List #46

 Full Video Tutorial:

Welcome!


Above is the prompt list tutorial video. The full prompt list can be found at the end of the video.
I encourage you to follow the prompts using your stash and see how the page turns out.

I have written the prompts for you to enjoy crafting without any expectations. Each of the lists that I write and follow, I have no plan in mind and I follow each step which makes crafting fun and care free. You can also use the same list multiple times and the outcome can be completely different.

Each of the prompt lists can be used for art journal pages, or if you prefer, you can create a canvas or tag with the steps. Whatever you feel like creating!

I hope you enjoy this weeks page.
If you create something that may have been inspired by the page/list, I would love to see your creation. Feel free to tag me on instagram with #SparklePrompts for any prompt list creations.


To begin this weeks page I primed with white gesso and added a patterned napkin in decoupage style to the full background with mod podge. I used a green acrylic paint to add stippling effect and used tissue to remove any excess paint, making sure the napkin below was still visible.
I used embossing powder with a leaf stamp to add interest to the background and heat set them.


For the focal image I chose to add a girl from a Tim Holtz Idea-ology set, she was added with PVA glue. I then chose some material to add interest to the focal image and used a glue gun to add this.
I then added some skeleton leaves to the background using mod podge.


For the title I added some stickers from another Tim Holtz idea-ology sticker set and stuck them down more permanently with mod podge.
I added a border for the top and bottom of the page, using the same material I had used for the focal image. 
As a final touch I added splashes to the page using an acrylic paint in the colour Flesh.


 Here is the full page spread, I hope you enjoyed this weeks prompt list.

If you have any questions, please do not hesitate to comment down below or on the comments in the YouTube video and I will get back to you.

I will see you next time, where we will turn your creative spark, into a Creative Sparkle.

Art Journal Page Process, Prompt List #52

 Full Video Tutorial: Welcome! Above is the prompt list tutorial video. The full prompt list can be found at the end of the video. I encoura...